April 28, 2011

Chicken and Avocado Panini with Jalapeno Mayo

Last night was an easy night...Matt was working late and I was doing stuff around the house...which included putting groceries away, even though I told myself it was clean out the pantry week!?!?! I am sure I'm not the only one who tries this and FAILS...Yesterday's trip to the store cost me $200 and I don't even know what I got!!!! SERIOUSLY, this has to STOP!
My first mistake was going to Family Fare on my way home. I think they jack their prices up just because they know that is the only option, besides Harding's...and let's just say that particular one isn't the cleanest..
Anyways, now I am just rambling and will get to the point. DINNER! Super easy and super delish!!!

Chicken and Avocado Panini
2 chicken breasts, pounded out to 1/2" thick
1 whole avocado, sliced
1 cup shredded monterey jack cheese
jalapeno mayo, as little or as much as you like, recipe below
4 semi-thick slices ciabatta or bread of your choice
butter for the outside of the bread
panini grill

Heat the panini grill to medium/high heat.
Season the chicken with the seasoning of you choice. I used Adam's Reserve kicked up chicken.
Place chicken on hot grill, close and cook until no longer pink. Approx 8 minutes on medium/high heat.
Remove the chicken from grill and set aside.
Butter the outside of the bread, start with the jalapeno mayo on the bottom next put the chicken, half of the avocado, half of the cheese and finish the with other slice of bread.
Repeat for the second sandwich.
Place on the hot panini grill, cover and cook until toasted to your liking. Approx 5 minutes, I gave it a good press or two to really smash it down.

NOTE: If you don't have a panini grill, you could easily do this in a pan/skillet using something heavy to press it down. For example, another pan or wrap a brick with heavy duty foil and that would work perfectly.


Printable Recipe!!!


Voila!
Served with a leafy green salad w/ balsamic vinaigrette
Jalapeno Mayo
1 1/2 cups mayo
2 whole fresh jalapenos, diced
juice from 1/2 a lime
1 tsp salt
1 tsp pepper
1 tsp dried oregano

Mix all ingredients together well.
Put on your favorite sandwiches!
Can be kept in the fridge for up to two weeks.


Printable Recipe!!!

I am now wishing that I hadn't sent my other half with the husband this morning...because it is sounding pretty dang good right now!!!

I just checked the weather and it is looking promising for the weekend...I am keeping my *fingers crossed* hoping I didn't just jinx it by saying that!

Have a fabuloso day!Pin It

April 27, 2011

Turkey Joes

I have so many things I want to post about...but today, I have to tell you about Monday night's dinner...

The only way I have ever made sloppy joes was using Manwich and I'm not gonna lie...I LOVE the stuff. It's so tangy and simply delish! I knew I didn't have any in the pantry and in an effort to try and clean out my pantry...I decided to make my own. How hard could it be? Not very!!! I browsed around for ideas and came across a great recipe from none other than The Pioneer Woman herself. I changed it up quite bit and they were AWESOME!!! I know most recipes call for brown sugar, we don't really like it sweet, so I didn't even bother with it...and I added jalapenos and lots of Tabasco for some heat!

I'm sorry Manwich but I don't know if I will be able to continue our relationship...

Turkey Joes

1 lb ground turkey
1/2 yellow onion, diced 
2 jalapenos, diced
1 tablespoon minced garlic
1 1/2 cups ketchup
3/4 to 1 cup water
1 tablespoon yellow mustard
1 tablespoon Worcestershire sauce
1 tablespoon A1 steak sauce
1 teaspoon crushed red pepper flakes
Tabasco sauce, to taste
2 tablespoons olive oil
salt & pepper, to taste
buns

Topping suggestions :
sliced cheese
diced onion
pickles
raw jalapenos
  1. Heat oil in a skillet over medium heat. Add the turkey, onions, garlic and jalapenos. Cook until turkey is no longer pink. Approx 10 minutes.
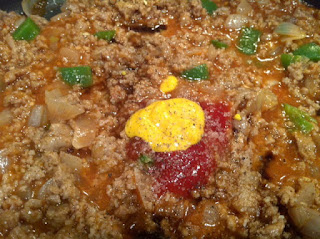
  2. Add the ketchup, water, mustard, Worcestershire, A1 sauce, crushed red pepper, Tabasco, salt and pepper. Simmer for 20-30 minutes tasting along the way. You many want to add more Tabasco, salt and/or pepper depending on you taste.
  3. Serve on your favorite bun and ENJOY!
NOTE : This makes about 6 sandwiches.


NOT pictured..A1, garlic, salt, pepper and mustard...my bad!


Needed a tad more ketchup and mustard...


Onion buns are the way to go! Soooo goood!

Simply Delicioso!!!!!!!!!


You could easily substitute the ground turkey for beef...we at so much red meat over the weekend that I felt the need to give my arteries a bit of a rest! Post on that to come later...

I hope everyone has a fabulous day!!!
I will try to, despite the fact that it is raining...AGAIN...
Pin It

April 22, 2011

Tangy Turkey Burgers with Mushrooms & Onions

Who doesn't love a good burger?? I know I do! I concocted these bad boys up last Summer and had a taste for them yesterday. I don't know what it is about turkey but I prefer to use it instead of ground beef when making burgers at home...maybe it's because you can't really find it on menus around here??? 
These are so easy to throw together, saute some veggies, slap on the grill and you're done. The steak seasoning and the hint of hot sauce really give it a great flavor. Not to mention the juicy onions and mushrooms to top it off! I like to put A1 sauce on mine...Sooo soooo delish!
I was really lazy last night and served them with good ole' frozen Ore-Ida fries...baked and topped with some seasoned salt. 

I don't have much time today, so I will quit yappin now! Here it goes...

Tangy Turkey Burgers

1 lb ground turkey
1 tablespoon steak seasoning
1 teaspoon seasoned salt
1 clove garlic, minced or crushed
a few dashes of black pepper
a few dashes of hot sauce, I like Louisiana 
1 small onion, sliced
1 1/2 cups sliced mushrooms
olive oil
provolone cheese slices
onion buns or bun of your choice


In a medium sized bowl add the first 6 ingredients and mix together by hand.
Form into 3-4 patties, depending on how big/small you want them.

Heat a few splashes of olive oil in a medium pan over high heat. Add the onions and cook for about 4 minutes, then add the mushrooms.
Cook until tender, approx 10 minutes.

Grill over medium-high heat for about 10-15 minutes, depending how thick the patties are, flipping once halfway through.
After you flip them, top with the mushrooms, onions and cheese. Continue to cook for about 4 minutes.
Remove from grill and ENJOY!


Sorry for the lack of pictures while actually on the grill....
I hope everyone has a fabulous Friday!

Pin It

April 18, 2011

Someone's got a case of the Monday's...

Hello out there! I hope everybody had a great weekend. I can't believe it is already Monday....Why can't the weekend be 5 days long and the work week be 2??? How great would that be??? In all honesty, I should be enjoying my freedom on the weekends because soon enough the 7 day work week will be back...Soooo I now retract my first question.
I spent the weekend getting some stuff done around the house and doing laundry. The two of us suuuuuuuuuuure do go through a lot of clothes during the week...Just when I think the laundry is caught up, another piles appears out of nowhere. Very mysterious...but the fact that my washer keeps giving me an error code and stops working every other load, doesn't the matter either!
Anyways, I'm debating on what to make for dinner tonight but I know it will probably be something simple..because I got lazy side tracked yesterday and need to finish the aforementioned laundry...
I saw this recipe over at Cooking With Libby last week(it may have even been Monday), new I had most of the ingredients at home and made it that night. It was oh so delicious! I made a few alterations because I couldn't remember the recipe exactly off hand but it turned out great. Thanks Libby!
If you haven't checked out her blog, you must do so, she's got great stuff goin on over there.

Chicken Chile Pasta Casserole
Adapted from : Cooking With Libby

1 pack boneless, skinless chicken breasts
1 chicken bouillon cube
1 box fusilli noodles, or pasta of your choice
4 tablespoons butter
4 stalks celery, chopped
1 whole yellow onion, chopped
1 red or green bell pepper, chopped
1 14.5 oz can fire roasted or regular diced tomatoes
1 14.5oz can stewed tomatoes
2 4.5oz cans diced green chilis
1 lb. processed cheese, cubed, I used velveeta
1 tablespoon hot sauce, optional
1 cup shredded cheese, cheddar or Mexican blend
  • Preheat oven to 350 degrees.
  • In a medium pot, add about 4 cups of water, the bouillon cube and chicken. Cook until the chicken is no longer pink. Approx 30 minutes on med/high heat. 
  • Remove the chicken but reserve the water. Set chicken aside to cool, when cooled, shred or cube.
  • Bring the water back up to a boil, add the noodles and cook for 10 minutes. Drain and set aside.
  • In a large saute pan, melt the butter over med/high heat. Add the onion, pepper and celery, cook until tender. 
  • Next add the cheese, cook until almost melted, then add the chicken, green chilis and hot sauce (if you are using it)
  • Finally, add the pasta, mix well, pour into a 9x13 pan, top with shredded cheese and bake at 350 degrees for 30-50 minutes.

***Mine took close to 50 minutes because it sat out for a couple of hours before I baked it***
****The original recipe called for 2 cans of sliced mushrooms. I didn't have them on hand but would definitely use them next time****

NOTE : You could use a store bought rotisserie chicken but make sure to cook your noodles with canned chicken broth or bouillon cubes.
I guess I forgot to take pictures of the chicken...SORRY!!!!!
It was paper plate night...


I hope ya'll like it!!!!!!!!
Adios for now!

Pin It

April 15, 2011

Best.Fried.Rice.EVER...

Seriously...
I came across this recipe on Tasty Kitchen and it instantly intrigued me... Matt and I LOVE fried rice and we love Sriracha. Mix them both together...SCORE!
There is a Japanese place that we go to often called Hana Yori and I am ALWAYS asking them how to make the rice because I can never seem to get it right. The chef told me the trick is to use cold rice, which I had never done before. It had been a while since I had attempted to make it when I came across this yesterday morning, so I decided to give it another whirl. I must say, it was pretty amazing...if you like spicy, you will love this! If you don't, you can just omit it and still love it!
After I saw the recipe on TK, I checked out who submitted the recipe and saw the link to her blog, Everyday Delightful. You should really go and check it out. There are some really great recipes over there!

Best.Fried.Rice.EVER
adapted from : Everyday Delightful

1/4 cup vegetable or canola oil
4 cups cooked white rice, cold
1 tablespoons minced garlic
1/2 yellow onion, finely diced
1 carrot, finely diced
1 cup cabbage, finely diced
2 teaspoons sesame oil
4 tablespoons low sodium soy sauce
3 tablespoons sriracha sauce, more/less to taste, we like heat
salt & pepper, to taste
4 eggs

  • In a wok or large pan, heat the vegetable oil over med/high heat until hot.
  • Add the onions and garlic, saute for 4 minutes then add the cabbage and carrots. Cook until crisp-tender.
  • Add the the soy and sriracha and saute for 2 minutes then add the rice.
  • Mix well and continue to cook until all the flavors have combined, approx 15 minutes.
  • Add the sesame oil, mix and remove from heat.
  • Fry the eggs to your liking. 
  • Serve the rice topped off with the fried eggs and ENJOY!


SERIOUSLY...AMAZING!
Just looking at these pictures is making me want this all over again...RIGHT NOW! Too bad I am at the office and sent what little leftovers we had left with Matt...At least I know he is having a good lunch!

I hope you guys try this and let me know what you think...I know you will love it....I was thinking next time about throwing some shrimp or chicken in with it and maybe even some more vegetables. The options are endless!!!

Have a GREAT Friday!!!

Vegetable Fried Rice on FoodistaVegetable Fried RicePin It

April 13, 2011

Spring has FINALLY sprung...Sort of...

This past weekend Spring decided to FINALLY show up...even though it only lasted until Sunday night. Saturday was a bit chilly in the morning but come afternoon, the sun was shining and I think we almost reached 70! It was a perfect day to bring the pit out of hibernation...
Ahh..the pit!!!
It was built by my Uncle Stevie somewhere around 10 years ago...maybe more. It is built directly into a trailer for easy transport! When Matt & I bought our house a few years ago, it would make frequent trips to and from my parents house and somehow has become a permanent fixture in our backyard...along with the gas grill, the mini pit and the caja china...BBQ much???
I looked all over my laptop for a picture of them all together...but of course, couldn't find one...I will take one this week and post it...

Well anyways...where was I going with this...Oh yeah, My Mom & I were CRAVING ribs...and who other to turn to, besides my Dad...who is in Texas right now...was Matt! So he fired up the pit and they may have been the best ribs.ever...or because I hadn't had them in so long...but who cares, the were AWESOME!

A few weeks ago I posted about Matt's Bourbon BBQ Sauce...since he is so busy at the greenhouse now, I knew he wouldn't have time or want to mess with it and frankly, neither did I...So this is what we do to zest up a bottled sauce...

Zested Up BBQ Sauce
enough for 2 slabs of ribs and 1 whole chicken
1 cup stubb's original bbq sauce
1/2 cup beer
1 tablespoon yellow mustard
1 teaspoon garlic powder

Mix all ingredients together and simmer for 10 minutes.
NOTE* You want the sauce to be warm to hot when you sauce the meat.

Feel free to use any beer of your choice or BBQ sauce but we LOVE Stubbs and Johnny Harris(but that doesn't need any zesting up)..we don't drink bud light but have some on hand for friends...
stir and simmer!
pure deliciousness!!!

I also made my Aunt Bea's BBQ beans...I'm not sure if I have ever mentioned this but, I have a large three ring binder filled with various family recipes, clippings from magazines, newspapers and recipes I have printed from the internet...It is my go to cookbook anytime I am looking for something great to make....
I came across this recipe and though I don't remember eating them as a kid, my Mom assured me I did and she then remembered how delicious they were...My Aunt Bea informed me yesterday that the recipe is over 40 years old, she hadn't made them in ages and that I inspired her to do so! Maybe these pictures will help get the ball rolling a little faster...

NOTE* The original recipe calls for 1/2 small box of brown sugar. I did not add this. The canned beans themselves already have a bit of a sweet flavor and I was afraid it would be too much for me.

BBQ Beans
1lb lean ground beef
1 large yellow onion, diced
3 11oz cans pork and beans
1 22oz can bush's grillin beans, I used the Southern Pit Barbecue
The following ingredients, I did NOT measure out...
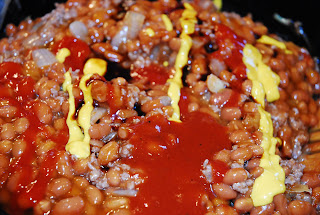
yellow mustard, a few squirts
Worcestershire sauce, a couple shakes
ketchup, a few squirts
bbq sauce, stubbs, about 2 tablespoons
salt & pepper, to taste
  1. In a large cast iron skillet or pan, brown the ground beef and onions. When done drain grease and return to pan.
  2. Add the remaining ingredients and mix together well. 
  3. Slowly bring to a boil and then turn down and simmer for about 30 minutes, stirring occasionally to keep from sticking to the bottom.


MMMMMMMMMM Gooooood!!!!!!


Kinda makes ya want to cookout this weekend huh????
I hope ya'll enjoy them as much as we did!
Until next time...


Pin It

April 8, 2011

Australia Eats!

Well, I've been back almost a full week now and it's about time I start blogging again!!! I feel so out of the loop in the blogging world, I have spent the last couple of days checking up on all my blogging buddies and friends on facebook!

I haven't really had a chance to cook anything new and exciting this week...so I though I would share with you some of the delicious meals I enjoyed while on the other side of the world...I wish I could tell you about them all...but there were just too many and some of them I didn't take pictures of...Do you ever feel weird about taking pictures of your food at a restaurant? I don't usually but when the restaurant is very dim inside...I feel kinda funny about it...so that is also why!

It all started in Beverly Hills. We had a ridiculously long layover at LAX, so I decided to hire a car and give us a quick tour of the LA area. It was about 2pm so we decided to have a late lunch and our driver recommended a fabulous Italian place called, Il Pastaio, and fabulous it was...and so was the people watching, but that's besides the point...They had quite possibly the BEST Carpaccio Di Tonno, tuna carpaccio, but it looked so delicious...I dug in before taking a picture even crossed my mind! Sorry!

What remains of my Mezzelune aka lobster ravioli..simply divine!
Mom's Cappellini

How cute are these salt & pepper shakers they had on the plane? I told the flight attendant on the flight home how adorable I though they were and he said I could take them! So, I snagged mine at dinner and then again at breakfast. I'm tellin ya. V Australia rocks!
So 16 hours later...we finally made it to Melbourne...and off we went!
Lunch at Cafe Andiamo, Degraves Street, Melbourne.
We shared chicken Parmesan and vegetable foccacia with a lovely salad!
Mint Chocolate Chip & Red Velvet Cupcakes
The Cupcake Bakery, Melbourne
Seriously DELISH! Good thing these do not exist where I live...or I would  be in trouble...
Goat cheese stuffed zucchini blossom...I will be attempting these this summer when zukes are everywhere!!!
ARIA Bar & Lounge
Langham Hotel
Melbourne, VIC
Matsuhisa
Belvedere Vodka & Hokusetsu Yura Yura Saki and shaken with fresh ginger and cucumber
Nobu
Melbourne, VIC
Skinny Latte
Somewhere in Melbourne and many other places throughout the trip.
How adorable is the little heart?????
After Melbourne, we hopped on a plane and headed to Brisbane. We then drove down to Yamba. It takes about 3.5 hours total. So we stopped in Byron Bay along the way to have lunch...and do some shopping of course.

Gorgonzola Salad
My first introduction to poached eggs on a salad. I have been in love ever since!
The Balcony Bar & Restaurant
Byron Bay, NSW
It was SOOOO hot...so I had a Mint Julep to cool me off :)
We continued our journey south and made it to Angourie and Yamba...gorgeous beach towns so close together they could be one! First order of business...
 
 
Fish & Chips
Flake & Squid
Yamba Fish Market
Yamba, NSW
Absolutley DELISH!!!

We wandered around and stumbled upon a really cute kitchen store, Kitchen to Table, where I saw this...
OMG!?!?!
And apparently that's a BARGAIN! 

Alas...the Big Brekky!!!
2 poached eggs, sausage, bacon, mushrooms, grilled tomato and 2 slices of delicious crispy toast
I have no idea what the name of this little joint was...but boy...was it good!
 We then flew to Sydney and headed to Katoomba in the Blue Mountains, which was about a 90 minute drive from the airport. Unfortunalty, I only have one meal photo to post from here...
Kangaroo Burger...yes sir...kangaroo! Slightly tough...and had a mild game taste to it.
I cant think of the name of the restaurant....oops
Katoomba, Blue Mountains, NSW

And the last stop on our trip was Sydney...Oh Sydney...how you are my favorite city in the world. There is just something about being there that has a special feeling to me...anyways, we spent our last two days here...and savored every moment!

My Mom had...
Seafood Pie
Jordan's Seafood Restaurant
Darling Harbour
Sydney, NSW


And I had...
Fried Soft Shell Crab with Asian Greens
Jordan's Seafood Restaurant
Darling Harbour
Sydney, NSW
  And that is the last of the photo journey...I do want to mention a 2 spots where I did not take pictures...but had AMAZING meals.

Darley's at our hotel in the Blue Mountains...stunning old house transformed into an amazing restaurant. We did the 3 course menu and it was worth every penny...I probably can't spell half of the things we ate...so I won't bother trying but think...rabbit & beef cheek.
The Cut in Sydney...After all the fish I had been eating, I was ready for a good steak. The concierge at our hotel recommened this place, it was a mere two months old but he assured us it would not dissapoint...and it sure didn't...I had the house specialty...Wagyu Standing Rib, sliced right in front of my eyes and ate almost every bite...best.i've.ever.had...and my Mom had the Wagyu Filet and for someone who doesn't eat much steak...ate almost all of it.

Check out the door handles in the bathroom...

How COOl is that?!?!?!?!
Well...I hope you enjoyed reading about my adventures in eating...I will be back to cooking this weekend!!!!!Pin It
Related Posts Plugin for WordPress, Blogger...