Hi blogger friends!!!
Well, we made it to Melbourne yesterday morning around 9am after 21 hours of flying time, NOT including layovers and our tour of LA! When we landed, we cleared customs and headed to the hotel. We are staying at The Langham and it is GORGEOUS!!! Marble everywhere and crazy friendly staff...that is what I love about Australia, everyone is so incredibly friendly. I don't have much becaus we are about to take off on a winery tour in Yarra Valley...but I wanted to check in and let you all know we made it!!!!!
Been eating some wonderful food and can't wait to tell you all about it soon!!!
Cheers!
Ps-in case any of you were wondering it is 8:32am on Sunday...Pin It
March 19, 2011
March 15, 2011
Two Casserole Tuesday!
I'm sure all of you out there have a favorite "go to" cookbook...mine happens to be La Pinata written by The Junior League of McAllen, Texas. It was first published in 1976 and has been a hit in South Texas ever since. It has so many different recipes...but my favorite part is the Mexican foods section...and if you haven't noticed, we love our Mexican food!!! I'm getting hungry just thinking about it...
A couple of weeks ago, I asked Matt what he was hungry for and his response was King Ranch Casserole...and I happily obliged...I tweaked mine a tad...so here it goes!
King Ranch Casserole
Adapted from : La Pinata
1 rotisserie chicken, skinned and deboned
1 can cream of mushroom
1 can of cream of chicken
1 can of RoTel tomatoes and green chilis
1 small can green chilis
½ can of chicken broth
1 dozen corn tortillas, cut into squares
1/2 yellow onion, chopped
2 cups of grated cheese, Mexican blend
- Preheat oven to 350
- In a blend, mix the soup, chilis, rotel & chicken broth. Blend until smooth. Set aside.
- In a 9x13 baking dish, place a layer of the chicken, 1/2 the tortillas, 1/2 the cheese and 1/2 the sauce.
- Repeat the layers, ending with the cheese.
- Bake uncovered for 1 hour or until cheese is browned and bubbly.
- Serve with saltines or tortilla chips for dipping!
 |
| I apologize for my lack of pictures for this dish...I don't know what happened to them!?! |
 |
| Perfect doneness! |
 |
| Soooooo delish!!!!!!!!!! |
Another great recipe from La Pinata is Chili Rellenos Casserole. In the cookbook it calls for canned whole green chilis but I prefer using fresh roasted poblanos and this time I added ground chorizo. So I decided to rename it to Roasted Poblano Casserole. It is ANOTHER favorite of my husbands...I swear sometimes he is just saying he loves my food...hmmm...
I serve it with warm flour tortillas and canned ranch style beans. Last night, I even made a taco out of it...there I go with the tacos again...!!! This would also make a great breakfast...just use ground sausage in place of the ground beef...yum!
Roasted Poblano Casserole
adapted from : La Pinata
4-6 poblano peppers, roasted, peeled and seeded


1lb ground beef
1/2 lb chorizo sausage, optional. It gives it a little extra kick
1/2 yellow onion, diced
4 eggs
2 cups shredded cheese, cheddar or Mexican blend
1 1/4 cup milk
1/4 cup flour
hot sauce, to taste. I used about 1 tablespoon
salt & pepper, to taste
To roast the peppers...
Preheat broiler to 550. Place peppers on a baking sheet and put under the broiler and for 5-7 minutes on each side.
Let cool, remove what you can of the skin, stems and seeds.
For the casserole...
Preheat oven to 350.
Brown the ground beef and onions, drain grease and set aside.
Cook the chorizo, drain and mix with the beef and onion mixture.
Arrange half of the peppers in the bottom of a square baking dish.
Top with the meat mixture, cheese and the remaining peppers.
In a bowl, whisk together eggs, milk, hot sauce, salt & pepper.
Slowly add the flour to the egg mixture and beat well with the whisk.
Pour the mixture evenly over the casserole.
Bake for 50-60 minutes.
Let set for 5-10 minutes before serving.


 |
| Delish!!!! |
 |
| Leftovers for lunch!!! |
I hope you have a great Tuesday and enjoy these two recipes!!! Super easy and perfect for a mid week dinner!
As some of you know, I am heading to Australia on Thursday for 17 days...I will not be posting any recipes for that time but please follow me at Sometimes Eccentric Steph for updates from Down Under!
March 11, 2011
This one's for the guys!
Matt LOVES to BBQ...rain, shine or snow and around here we have all three! Two Christmas' ago, my Dad received a La Caja China from a friend...at first we were all like "What the heck??" but once it was put together it became an instant hit!!! Needless to say Matt had to have his own, so for his birthday last June, my parents got him one, except they got him the bigger version. Score!!!
What is it you say? La Caja China, also known as a Chinese roasting box, is designed to BBQ a whole pig but will cook practically any other meat as well. The initial market for these was geared toward the vast Cuban-American population in Miami but quickly sparked the interest of BBQ enthusiasts everywhere. Last Fourth of July Matt roasted a 70lb pig in less than 4 hours!!!! Yes! and it was OUTSTANDING!!! I just searched high and low for a pic on my laptop and can't find one...but don't worry, we will be doing that again this Fourth of July without a doubt...along with the huge party that comes with it!
Matt has been pretty busy at the Greenhouse these past few weeks, so he hasn't had a chance to BBQ as much as he likes...so a couple of weekends he made a slab of ribs, a whole chicken and even made his own sauce!!! I gotta tell ya...when he was making the sauce it was hard for me not to try and jump in and give my two cents...not that I knew what I was doing but I'm just so used to being the one standing where he was :) But I assure you, he knows what he's doing.
Anyways...here it goes!
La Caja China Ribs -n- Chicken
recipe by : Matt
1 slab of baby back ribs
1 whole chicken, cut in half
your favorite poultry/rib rub
24 lbs charcoal, kingsford is Matt's preferred brand
lighter fluid
Season the meat generously with the seasoning on both sides.
Place the meat on the grill rack, bone side up, place the cover over the box and add approx 16lbs of charcoal in two separate piles and light.
After 20 minutes, spread the coals evenly across the top. Your actual cooking time starts now.
After 45 minutes, lift up the top, flip the ribs and chicken. Replace cover. Add approx 8 more lbs of charcoal evenly across the top and continue cooking until internal temp of the chicken reaches 165 degrees.
If you want to sauce your meat while still in the box, approx 10 minutes before the meat is done, sauce it. Otherwise, you can sauce it once you bring it inside.


So guys...go out there and buy yourself a Caja China...you will not regret it!
Matt's Bourbon BBQ Sauce
Recipe by: Matt
3/4 cup bourbon, preferably Maker's Mark
1/2 yellow onion, finely diced
2 tablespoons minced garlic
2 cups ketchup
1/8 cup yellow mustard
1 cup apple cider vinegar
2 tablespoons worcesteshire sauce
2 teaspoons liquid smoke
2 tablespoons molasasses
1/4 cups brown sugar
1 tablespoon salt
1 tablespoon black pepper
hot sauce, to taste
In a medium sauce pan ad the bourbon, onion and garlic. Cook down for approx 10 minutes.
Add the remaining ingredients and simmer for at least 30 minutes. The longer the better.
If you prefer a smooth sauce, run through a strainer and discard onion and garlic.
INSERT PICTURES HERE...
I SADLY...deleted the pictures of the sauce...oopsie....I was clearing out the photos on my iPhone yesterday and thought I had already transfered them...but turns out I didn't. FAIL!!!! But I promise you...this sauce is the way to go...
ENJOY!!!
*Caja China information courtesy of www.lacajachina.com and www.squidoo.com*
Pin It
March 10, 2011
All about Mexican...
I don't think I know a single person who does not love Mexican food...What's not to love? There are so many different/delish dishes and one of them is carnitas, which just so happens to be my husbands favorite.Carnitas is braised or roasted pork. It is so juicy and tender on the inside with a nice crunchy outside that is so so so good. You can eat them alone or as a taco with diced onion and fresh cilantro i.e carnita tacos...and we all know how much we love tacos over here....Last Sunday Matt and I spent a better part of the day cooking up this delicious Mexican feast. Homemade tortillas and all!!!
Carnitas
1 4-5 lb pork butt
2 tablespoons kosher salt
1/2 cup vegetable oil
1 cup chicken stock
2 tablespoons lard, yes lard...i suppose vegetable shortening would do ;)
4 cloves garlic, thinly sliced
2 bay leaves
1 tablespoon chili powder
1 tablespoon ground cumin
1 teaspoon oregano
pepper, to taste
Preheat oven to 350 degrees.
Cut the pork into 4-6 inch chunks and season heavily with kosher salt.
Cut the pork into 4-6 inch chunks and season heavily with kosher salt.
In a dutch oven or large heavy pan, heat oil over high heat.
Brown the pork on all sides. If you cannot fit the meat in a single layer all at once, brown in batches. Approx 5 minutes on each side.
Set meat aside on a paper towel lined plate to drain excess grease.
Next, add the chicken stock, garlic cloves, bay leaves, chili powder, ground cumin and pepper to the hot pan. Scrape the bottom of the pan the particles on the bottom and simmer for a few minutes. Add the lard and cook down.
Return the meat to the pan and cover with water until meat is covered about 2/3.
Place pan/pot back in the oven and cook for 3 hours.
Remove from oven and let cool.
When cool enough to touch, break up meat into chunks or shred, however you prefer.
Place back in the oven to brown and crisp to your likeness. About 10 minutes.
Serve with fresh corn tortillas.
Top with chopped cilantro, onions.


 |
| In the words of Charlie Sheen...WINNING!!! |
Ridiculously Delish!!!
Corn Tortillas
2 cups corn masa flour, I use Maseca
1 1/4 cup water
1/4 tsp salt
tortilla press
two pieces of plastic wrap
Combine all ingredients into a bowl and knead for two minutes to form a soft dough.
If dough feels dry, add a spoonful of water at a time.
Roll into little two inch balls and cover with moist towel.
Heat a small non stick pan or flat griddle over med/high heat.
Place a piece of plastic wrap on the bottom of the press, place a dough ball on it, cover with the other piece of plastic wrap and press down hard.
Carefully place the tortilla on the hot pan and cook for 50-60 seconds on each side.
I got this recipe right off the Maseca bag and it makes 16-18 tortillas.


Finito!!!
March 4, 2011
All about Leeeeemmmmmmmoooooooooonnnnsssssssss!!!
Ok, I know the title of this post is ABSOLUTELY ridiculous. But it is an inside joke that I share with some girlfriends from an incident that happened on a trip to Vegas back in 2008....and I thought they would get a kick out of it.
I LOVE lemons...seriously...LOVE them. 9 times out of 10 I will order lemons and just eat them with salt while I am waiting for my food...I get this from my Mom because she does the same thing. But they are just SO good, I can't resist. DELISH!

Yesterday, I was craving something lemony...I was browsing through this cookbook and found a recipe for Chicken with a Lemon Caper sauce...and ended up with this...


Pin It
I LOVE lemons...seriously...LOVE them. 9 times out of 10 I will order lemons and just eat them with salt while I am waiting for my food...I get this from my Mom because she does the same thing. But they are just SO good, I can't resist. DELISH!

Kickin' Lemon Chicken
1 package boneless, skinless chicken breast
1 can artichokes, drained and roughly chopped
1 small jar capers, drained
1/2 yellow onion, sliced
2 cups fresh mushrooms, sliced
1/2 tablespoon garlic, minced
1/2 cup flour
2 eggs, slightly beaten
2 cups dry white wine
1 cup chicken stock
1/4 cup fresh parsley, chopped
2 large lemons or 3 smaller
2 tablespoons butter
1/2 cup olive oil
salt & pepper, to taste
- Set out two dishes for dredging, one for the flour and one for the egg.
- Pound out the chicken breast until uniform in size. You want them about 1/2 inch thick. Season with salt & pepper on both sides.
- Dredge the chicken in egg mixture on both sides, then the flour.
- In a large skillet, heat the olive oil over high heat, melt the butter and place chicken in the pan and cook on high for 5 minutes.
- Turn heat down to medium and turn chicken over and continue to cook until no longer pink. About 10 minutes. You may have to cook in batches, depending on the size of the breast. You don't want to overcrowd the pan.
- When done, set aside and cover or place in the oven to keep warm.
- In the same skillet, add the onions and garlic, cook about 3 minutes. Add the mushrooms and cook about 2 minutes.
- Add the artichokes, capers, fresh lemon juice, chicken stock, white wine, parsley, salt & pepper. Stir together and let simmer for about 5 minutes.


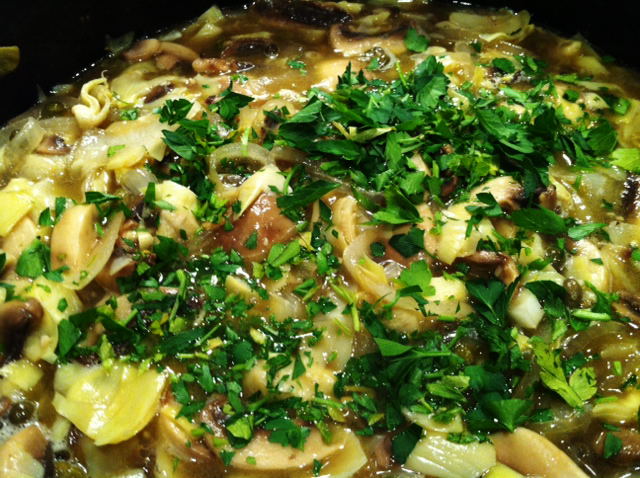

DELISH!!!
Now, to continue on with the lemon theme...I give you Lemon Cake...this recipe comes from my Grandma Shirley. Hi Grandma!
Leeemmmmmmmmmoooooooooooooonnnnnnnnn Cake
1 box lemon cake mix
1 small package instant lemon pudding
4 eggs
3/4 cup oil
3/4 cup water
2 cups 10x sugar
2 tsp oil
1/3 cup orange juice
For the cake :
- Preheat oven to 350 degrees
- Beat first 5 ingredients for 8 minutes
- Bake for 40 minutes.
- As soon as you take it out of the oven, poke holes with wooden spoon handle.
For the frosting :
- Mix last three ingredients together well.
- Drizzle over top of cake.


No idea why I had the milk out and notice the cake mix...it says yellow. Yep, my ability to follow directions shines again! It was as lemony as it should have been but still good.


This is the best cake...in my opinion...even my brother loves it and he is SOOOO not a sweets person...at all.
I just got a call on skype from my Nana in Ocala, FL. How cute is that??????????? While I had her on the video chat, I asked her for her banana pudding recipe and it brought back so many delicious memories! I can't wait to make it this weekend and share it with ya'll!
Have a DELICIOUS weekend everyone!
Subscribe to:
Posts (Atom)